TypeScript 와 Redux 를 이용하여 Todo-List 만들기
TypeScript의 기초를 알아보았고 Redux의 사용법도 알았으니 TypeScript와 Redux를 사용하여 Todo-List를 만들어보자
이 게시글에서는 TypeScript환경에서 Redux를 더욱 편하게 사용하기 위해 typesafe-actions 라는 라이브러리를
사용한다 Redux에서는 redux-actions라는 라이브러리가 있지만 TypeScript 환경에서는 사용하기 좋지 않다
프로젝트 구조
이 프로젝트는 데이터를 다루는 부분 Container 컴포넌트와 화면을 표현하는 부분 Presentational 컴포넌트를 구분하여 개발하였다. 아래를 통해 살펴보자
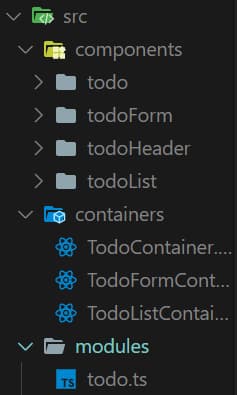
components 폴더에는 Presentational 컴포넌트들이 , containers 폴더에는 container 컴포넌트, 그리고 modules 폴더에는 리덕스 모듈을 넣는 구조로 진행헀다.
라이브러리 설치
redux 를 설치하면 TypeScript가 자체적으로 지원되지만 react-redux의 경우에는 지원이 되지 않기때문에 패키지명 앞에
@types 를 붙여서 패키지를 설치해야 한다
$ yarn create-react-app ts-react-app TS-Redux-Todo --typescript
$ cd TS-Redux-Todo
$ yarn add redux react-redux @types/react-redux
@types는 TypeScript를 지원하지않는 라이브러리에 TypeScript를 지원 받을 수 있게 해주는 라이브러리다
이제 typesafe-actions 라이브러리를 설치해보자
$ yarn add typesafe-actions
리덕스 모듈 생성하기
우선 코드의 최상단에 아래와 같은 유틸 함수 및 타입을 불러오자
import { ActionType, createAction, createReducer } from 'typesafe-actions';
Interface 설정하기
interface TodoItemDataParams {
  id: number;
  text: string;
  done: boolean;
}

interface ToDosState {
  todoItems: TodoItemDataParams[];
}
리듀서에서 액션의 페이로드나 initialState의 타입을 설정하기 위해 interface를 설정해준다.
액션타입 선언
const SUBMIT = 'todo/SUBMIT';
const REMOVE = 'todo/REMOVE';
const TOGGLE = 'todo/TOGGLE';
typesafe-actions를 사용하지 않았다면 const INCREASE = 'counter/INCREASE' as const; 와 같이 as const를 붙여줬어야 하지만 typesafe-actions를 사용한다면 붙일 필요가 없다
액션 생성 함수 만들기
액션 생성 함수를 선언 할 때는 createAction 이라는 함수를 사용해야 한다.
export const submit = createAction(SUBMIT)<TodoItemDataParams>();
//객체를 페이로드로 받아오기 때문에 interface의 TodoItemDataParams를 타입으로 지정
export const remove = createAction(REMOVE)<number>();
export const toggle = createAction(TOGGLE)<number>();
액션 생성함수를 만들 때 페이로드로 들어가는 값은 Generic으로 정해줄 수 있는데, 만약 페이로드에 들어가는 값이 없다면 Generic을 생략해도 된다 위와 같은 경우는 submit의 페이로드로 들어가는 값은 객체이기 때문에 객체안의 값들을 담고있는Iinterface를 Generic으로 정해주었다
액션의 객체 타입 만들기
리듀서를 작성 할 때 action 파라미터의 타입을 설정하기 위해서 모든 액션들의 TypeScript 타입을 준비해주어야 한다
const actions = { submit, remove, toggle };
type TodoActions = ActionType<typeof actions>;
ActionType을 사용할 때는 Actions라는 객체에 모든 액션 생성함수를 넣은 다음에, ActionType으로 감싸주면 된다
리듀서 만들기
createReducer를 사용하여 리듀서를 생성하자 createReducer의 사용법은 Redux-toolkit의 createReducer의 사용법과 동일하다
createReducer는 Generic 으로 상태의 타입과 액션들의 타입을 넣어주어야 한다
const initialState: ToDosState = {
  // initialState에 interface ToDosState를 타입으로 지정
  todoItems: [],
};

const todo = createReducer<ToDosState, TodoActions>(initialState, {
  // 객체를 페이로드로 받아 todoItems State에 추가해주는 SUBMIT 액션
  [SUBMIT]: (state, action) => ({
    ...state,
    todoItems: [...state.todoItems, action.payload],
  }),
  [REMOVE]: (state, action) => ({
    // todoList중 선택된 todo의 Id를 페이로드로 받아 선택된 todo를 삭제해주는 REMOVE 액션
    ...state,
    todoItems: state.todoItems.filter(
      (todo: { id: number }) => todo.id !== action.payload,
    ),
  }),
  [TOGGLE]: (state, action) => ({
    // todoList중 선택된 todo의 Id를 페이로드로 받아 done 속성을 변경해주는 TOGGLE 액션
    ...state,
    todoItems: state.todoItems.map((todo) =>
      todo.id === action.payload ? { ...todo, done: !todo.done } : todo,
    ),
  }),
});
ActionType으로 감싸준 TodoActions와 initialState를 설정하여 각각의 액션을 처리한다
container 컴포넌트들 생성하기
container 컴포넌트로써 TodoContainer, TodoFormContainer, TodoListContainer 컴포넌트를 각각 생성한다
우선 모든 컴포넌트들을 연결시켜줄 TodoContainer 먼저 생성해보자
TodoContainer
import React, { useState } from 'react';
import { useSelector } from 'react-redux';
import Todo from '../components/todo/Todo';

interface TodoItem {
  id: number;
  text: string;
  done: boolean;
}

interface ReduxState {
  // useSelector로 받아온 State의 상태를 지정해주는 interface
  todoItems: TodoItem[];
}

function TodoContainer() {
  const [selected, setSelected] = useState('Doing');
  // 선택된 todo가 선택되어 completed 되었는지 확인하기 위한 state

  const handleSelected = (e: React.MouseEvent<HTMLButtonElement>) => {
    // 클릭된 todo의 event객체를 받아와서 selected State를 변경해주는 함수
    setSelected(e.currentTarget.value);
  };

  const todos = useSelector((state: ReduxState) => state.todoItems);

  let doingTodo: TodoItem[] = todos.filter((todo) => todo.done === false);
  let completedTodo: TodoItem[] = todos.filter((todo) => todo.done === true);
  //doingTodo, completedTodo 변수는 상태로 받아온 todos를 속성 done이 false일때, true일때를
  //구분하여 새로운 배열을 리턴하여 담고있는 변수

  return (
    <Todo
      todos={todos}
      handleSelected={handleSelected}
      selected={selected}
      doingTodo={doingTodo}
      completedTodo={completedTodo}
    />
  );
}

export default TodoContainer;
위와 같이 TodoContainer 컴포넌트에서 리덕스의 상태를 받고 내부 State를 생성하여 Presentational 컴포넌트인 Todo 컴포넌트에 Props로 전달해준다
TodoFormContainer
다음으로 TodoForm 컴포넌트의 데이터를 다루는 TodoFormContainer 컴포넌트를 생성해보자
import React, { useCallback } from 'react';
import TodoForm from '../components/todoForm/TodoForm';
import { useState } from 'react';
import { submit } from '../modules/todo'; // 액션 submit import
import { useDispatch } from 'react-redux';

function TodoFormContainer() {
  const [form, setForm] = useState('');
  const [id, setId] = useState(1);

  const dispatch = useDispatch(); //useDispatch hook을 사용하여 dispatch 변수에 담는다

  const onSubmit = useCallback(
    // 실행되어지면 매개변수 text를 받아 새로운 객체를 생성하여 submit 액션을 디스패치 해주는 함수이다
    (text) => {
      dispatch(submit({ id: id, text: text, done: false }));
      setId(id + 1); // submit되면 다음 id값 1 증가
    },
    [dispatch, id],
  );

  const handleSubmit = (e: React.FormEvent<HTMLFormElement>) => {
    e.preventDefault();
    onSubmit(form);
    setForm('');
  };

  const onChange = (e: React.ChangeEvent<HTMLInputElement>) => {
    const { value } = e.target;
    setForm(value);
  };

  return (
    <TodoForm
      form={form}
      handleSubmit={handleSubmit}
      onChange={onChange}
    ></TodoForm>
  );
}

export default TodoFormContainer;
TodoFormContainer 컴포넌트에서는 useDispatch를 사용해 액션 submit을 실행시켜 TodoList에 추가 될 객체를 페이로드로 보내준다
TodoListContainer
다음으로 TodoList 컴포넌트의 데이터를 다루는 TodoListContainer 컴포넌트를 생성해보자
import React, { useCallback } from 'react';
import { useDispatch } from 'react-redux';
import TodoList from '../components/todoList/TodoList';
import { remove, toggle } from '../modules/todo';

interface TodoListContainerProps {
  // todo 컴포넌트에서 받은 Props의 타입을 지정해줄 interface
  todo: {
    id: number;
    text: string;
    done: boolean;
  };
}

function TodoListContainer({ todo }: TodoListContainerProps) {
  const dispatch = useDispatch(); //useDispatch hook 사용하여 dispatch 변수에 담는다

  const onRemove = useCallback(
    // todo라는 이름의 선택된 todo의 id를 담은 매개변수를 remove 액션의 페이로드로 넣는다
    (todo: number) => dispatch(remove(todo)),
    [dispatch],
  );

  const onToggle = useCallback(
    // todo라는 이름의 선택된 todo의 id를 담은 매개변수를 toggle 액션의 페이로드로 넣는다
    (todo: number) => dispatch(toggle(todo)),
    [dispatch],
  );

  const handleDelete = () => {
    onRemove(todo.id);
  };

  const handleToggle = () => {
    onToggle(todo.id);
  };

  return (
    <TodoList
      todo={todo}
      handleDelete={handleDelete}
      handleToggle={handleToggle}
    />
  );
}

export default React.memo(TodoListContainer);
TodoListContainer 에서는 useDispatch를 사용하여 remove, toggle 액션을 디스패치 해준다
Presentational 컴포넌트 생성하기
Todo
import React from 'react';
import TodoHeader from '../todoHeader/TodoHeader';
import styles from './Todo.module.css';
import TodoFormContainer from '../../containers/TodoFormContainer';
import TodoListContainer from '../../containers/TodoListContainer';

interface TodoItem {
  id: number;
  text: string;
  done: boolean;
}

interface TodoProps {
  todos: TodoItem[];
  handleSelected: (e: React.MouseEvent<HTMLButtonElement>) => void;
  selected: string;
  doingTodo: TodoItem[];
  completedTodo: TodoItem[];
}

function Todo({
  todos,
  handleSelected,
  selected,
  doingTodo,
  completedTodo,
}: TodoProps) {
  return (
    <div className={styles.Todo}>
      <header className={styles.header}>
        <TodoHeader />
      </header>
      <section className={styles.form}>
        <TodoFormContainer />
      </section>
      <div className={styles.buttons}>
        // 각 버튼마다 selected 상태를 확인하여 동일하면 class를 추가해주도록 함
        <button
          className={`${styles.button} ${
            selected === 'Doing' && styles.btnClicked
          }`}
          value="Doing"
          onClick={handleSelected}
        >
          Doing
        </button>
        <button
          className={`${styles.button} ${
            selected === 'Completed' && styles.btnClicked
          }`}
          value="Completed"
          onClick={handleSelected}
        >
          Completed
        </button>
        <button
          className={`${styles.button} ${
            selected === 'ViewAll' && styles.btnClicked
          }`}
          value="ViewAll"
          onClick={handleSelected}
        >
          View All
        </button>
      </div>

      <ul className={styles.list}>
        // selected 상태를 확인하여 지정된 값과 일치하면 그에맞는 컴포넌트를
        보여주도록 함
        {selected === 'ViewAll' &&
          todos.map((todo) => <TodoListContainer todo={todo} key={todo.id} />)}
        {selected === 'Doing' &&
          doingTodo.map((todo) => (
            <TodoListContainer todo={todo} key={todo.id} />
          ))}
        {selected === 'Completed' &&
          completedTodo.map((todo) => (
            <TodoListContainer todo={todo} key={todo.id} />
          ))}
      </ul>
    </div>
  );
}

export default Todo;
Todo 컴포넌트에서는 selected 상태를 확인하여 TodoContainer 컴포넌트에서 넘겨준 doingTodo, completedTodo 배열을 map 을 통해 보여준다
TodoForm
import React from 'react';
import styles from './TodoForm.module.css';

interface FormProps {
  // Props로 받은 함수와 State의 타입 지정
  handleSubmit: (e: React.FormEvent<HTMLFormElement>) => void;
  onChange: (e: React.ChangeEvent<HTMLInputElement>) => void;
  form: string;
}

function TodoForm({ handleSubmit, onChange, form }: FormProps) {
  return (
    <form onSubmit={handleSubmit} className={styles.form}>
      <input value={form} onChange={onChange} className={styles.input} />
      <button type="submit" className={styles.button}>
        ADD
      </button>
    </form>
  );
}

export default TodoForm;
TodoForm 컴포넌트에서는 TodoFormContainer 컴포넌트에서 받은 Props의 onChange, handleSubmit 함수로 input의 값을 변경하는 함수를 실행, TodoList 의 Todo를 추가해주는 함수를 실행시킨다
TodoList
import React from 'react';
import styles from './TodoList.module.css';
interface TodoListProps {
  todo: {
    id: number;
    text: string;
    done: boolean;
  };
  handleDelete: (todo: any) => void;
  handleToggle: (todo: any) => void;
}

function TodoList({ todo, handleDelete, handleToggle }: TodoListProps) {
  return (
    <li className={styles.todo}>
      <span style={{ textDecoration: todo.done ? 'line-through' : 'none' }}>
        {todo.text}
      </span>
      <div>
        <input
          type="checkbox"
          checked={todo.done}
          readOnly={true}
          onClick={handleToggle}
        />
        <button className={styles.delete} type="button" onClick={handleDelete}>
          🗑
        </button>
      </div>
    </li>
  );
}

export default TodoList;
TodoList 컴포넌트에서는 TodoListContainer 컴포넌트에서 받은 Props의 handleToggle, handleDelete함수로 TodoList를 삭제하거나, 선택된 Todo의 done속성을 변경하는 함수를 실행하도록 한다
TodoHeader
마지막으로 TodoList의 Header 이다
import React from 'react';
import styles from './TodoHeader.module.css';

function TodoHeader() {
  return (
    <div className={styles.container}>
      <header className={styles.header}>Todo-List</header>
      <span className={styles.description}>what is your next plan?</span>
    </div>
  );
}

export default TodoHeader;
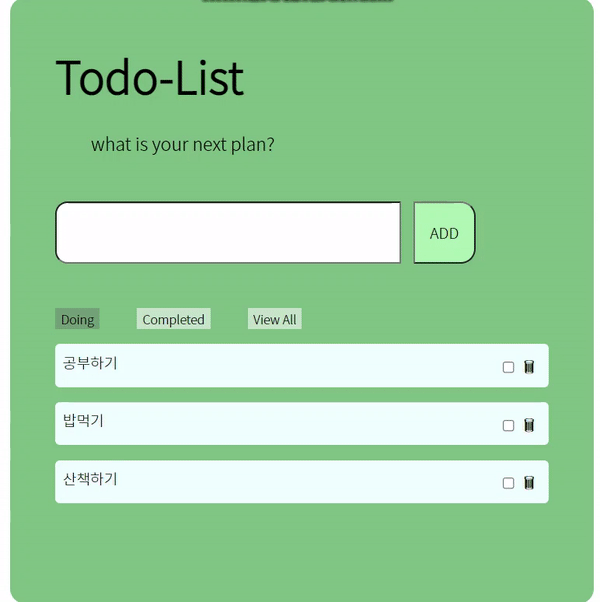
이제 완성된 모습을 살펴보자 😊
이렇게 Redux와 TypeScript를 같이 사용하는 방법을 알아보았다 typesafe-actions로 리덕스를 더욱 편하게 다룰 수 있는 것 같아 더욱 공부할 필요를 느낀다!